Showing posts with label Splenda. Show all posts

Wednesday, September 8, 2010

LC Peanut Butter and Jelly Bars

Ever since I saw an episode of Barefoot Contessa in which Ina Garten makes these luscious looking peanut butter and jelly bars, I've been wanting to give it a try. However, the price for jellies here in the Philippines is ludicrous! And since I didn't grow up on PB&J sandwiches, I didn't really know what jelly flavor goes well with peanut butter.

I remember asking my husband this question and he suggested grape jelly. He said it makes the best peanut butter and jelly sandwich. We were able to find Smucker's concord grape jelly but I still wasn't able to make the recipe. Then I decided to go low carb. It seemed as if all hope was lost.

Until my awesome mother-in-law sent sugar free Smucker's concord grape jelly (in addition to all sorts of low carb goodies) and I just knew I had to try to convert this recipe to low carb.

Using the cookie recipe I made a few weeks before, I managed to recreate my own low carb PB&J bars. Hubby prefers jelly to be spread on top of the cookie after baking but I find that the jelly when baked with the cookie made it chewier. So it's up to you, really, however you prefer it. I didn't make the cookie batter too sweet because I expected the jelly to make up for it. For me the sweetness was just right.


Low Carb Peanut Butter and Jelly Bars

Ingredients
2 cups peanuts, finely ground (you can roast this beforehand but I used raw)
2 eggs
1/4 cup unsweetened peanut butter
3/4 cup Splenda, granulated or whatever sweetener you prefer
1 tsp baking powder
1 tsp salt
1/4 cup sugar free jelly

1. Mix the first six ingredients until well blended. Grease pan with butter. I used an 8"x8" pan.
2. Pour the cookie dough into the pan and press it down until evenly distributed.
3. Stir the jelly until spreadable and no longer gelatinous. Pour on top of peanut dough and spread evenly.
4. Bake at 350 degrees until the jelly bubbles up and the sides pull away. I would suggest baking it longer than that as the sides with its crispiness were my favorites. If you prefer chewier cookies, you can take it out as soon as the sides are brown.
5. Let cool and slice into squares. I sliced this into 16 squares but you can definitely make it smaller if you want.

Friday, September 3, 2010

No Bake ChocoNut Cheesecake


My hubby says this is the best cheesecake I've ever made. No pressure. It's not really my recipe as I just followed the no bake cheesecake on the Knox box. But I think the crust made this cheesecake even better.

No Bake Choconut Cheesecake

Ingredients
For Crust
1 1/2 cups of peanuts, if using raw roast first
1/2 cup Splenda, granulated
1/4 cup butter
2 oz dark chocolate
1 T butter

Directions
1. Grind peanuts until fine. Mix Splenda and butter. Pour onto prepared pie pan and gently push the crust mixture and until the bottom of the pan is covered. Place pan in freezer.
2. Chop dark chocolate and then put in microwave safe bowl with 1 T butter. Heat for 30 seconds, pausing every 10 seconds to swirl.
3. Take crust out of freezer. Pour the melted chocolate onto crust. Using a rubber spatula, spread the melted chocolate until the entire crust is covered thinly. Put back in freezer or fridge.

For Cheesecake Filling
2 8oz cream cheese, room temperature
1 t vanilla extract
1/2 cup Splenda, granulated
1 package Knox gelatin
1 cup boiling water

Directions
1. Beat cream cheese with vanilla until there are no lumps and cream cheese is smooth.
2. Mix Splenda and gelatin in a bowl and then add boiling water. Stir to dissolve gelatin.
3. While beating the cream cheese and vanilla, pour the gelatin mixture gradually. Mix for a few seconds.
4. Take crust out of the fridge and pour the filling in. Let set in fridge for at least 2 hours.

Since I had some sugar free toffee squares, I chopped them up and just sprinkled over the crust before pouring the filling. Although it gave a nice crunch, the cheesecake doesn't really need it since the crust is so good.

As you can probably tell this is not for an every day treat. Make it for a special occasion and invite people so you don't eat the whole thing by yourself.

Sunday, May 30, 2010

"I-Can't-Believe-This-Isn't-Cheating" Cream Cheese Balls


You might think I'm exagerrating but I'm not. Whenever one of these cream cheese balls touch my lips, my brain sends out an alarm: CHEATING! CHEATING! CHEATING! But I, of course, know that the nerve endings in my brain are just spazzing out from the deliciousness that my tongue is experiencing.

I first met these balls whilst reading a thread on LCF about what to do with 18 blocks of cream cheese. Since my hubby hoardes Philly cream cheese blocks like it's going out of style (but seriously, we don't find them so easily in our neck of the woods so hoarding is a great idea, moreso because of this recipe). “didi” posted,“Keto Balls! They can live in the freezer.” Followed by the link to the recipe.

Now... Keto balls sounded... vile, like something you'd find living in the socks you wore to the gym once and forgot to throw into the washer because it managed to crawl BY ITSELF under the bed only to be found when you were looking for your flip flops. It sounded nasty and gross. But since I like living on the edge, I clicked the link. And boy was I happy to be the adventurous clicker that I am. Because this recipe is anything but vile or nasty or gross. It is divine and easy and oh-so-good you'd forget, your brain will actually forget, that it's LEGAL.

You may find the original recipe here. The one below is a double batch and with a minor tweak.


See the lovely flecks of green from the pistachios?

Ingredients

Cream cheese, 2 (8 oz) blocks
Unsalted butter, 2 sticks or 1 cup
Splenda, 1 cup
Nuts of your choice (I used ½ cup of pistachios)

1.Make sure the cream cheese and butter are at room temperature. This will make it easier to mix. With an electric mixer, blend the cream cheese and butter well. Add the Splenda and mix some more.
2.For the nuts, I chose to incorporate them into the mixture rather than cover the balls. I only had ½ cup of pistachios that I crumbled and crushed into smaller bits, not powdery though. I gently folded the nuts into the mixture.
3.Refrigerate for at least an hour.
4.Scoop the mixture onto a cookie sheet lined with cling wrap or parchment paper. I used my small ice cream scooper which can hold 1 tablespoon + 1 teaspoon. Then I stuck toothpicks into the little balls before putting the cookie sheet into the freezer. You can certainly roll after scooping, but I didn't want to deal with the mess. I made about 30 balls with this batch.
5.After freezing, transfer the cream cheese balls into a covered container and keep in the freezer.

Just a couple of notes: I have recently gotten sensitive to sweeteners and the 1 cup of Splenda used here is too sweet for me. Next time I will use less Splenda, maybe start with half a cup and take it from there. Second, make sure you use UNsalted butter so that the flavor of the cream cheese remains the star of the show. Third, with the nuts this is obviously NOT for Induction but you can just omit the nuts and I bet it will still taste good and you'd feel like you're cheating. Lastly, didi is right. These will live in the freezer... but not for too long. I have to constantly remind myself that I can only have one ball a day. So thanks to didi for linking this and to MandyM for posting the recipe on LCF.

Sunday, May 2, 2010

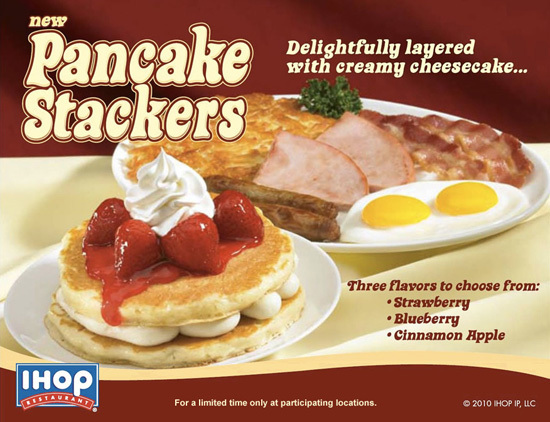
NOT IHOP's Pancake Cheesecake Stacker


I know it doesn't look as good as this but it's really, really, really good.

I made a cheesecake mousse which is very easy and put that between two of SFS's Pancakes! Delicious! Awesome! If you're past Induction you can even add strawberries and it will look just like the real thing.

I didn't make a real cheesecake because I thought it would add to the carb count. But please bear in mind this is so decadent and so rich that you should only have it during special days. Unless you have the self-control not to eat more than 1 "stacker".

Besides if I baked a cheesecake it would've taken longer and I was DYING to make this. Also, if the filling was an actual cheesecake then I wouldn't have gotten this adorable picture.


This is the closest I will get to an IHOP. *sigh*

Cheesecake Mousse

*The recipe I found asked for 4 oz cream cheese but I needed more cream cheese-y taste so I used an entire 8 oz. block. This makes a LOT. You have been warned.

8 oz cream cheese at room temperature, DO NOT SOFTEN IN MICROWAVE
3/4 cup heavy whipping cream
2 T Splenda, granulated
2 t vanilla extract

Whip all ingredients until stiff. I don't know if it was our hot weather here or the fact that I doubled the cream cheese amount and left the cream the same but it never got stiff, just semi soft. It kept its shape and that's good enough for me.

Put mousse in well-sealed bag and keep in the fridge until ready to use.

SugarFreeSheila's Amazing Induction Friendly Pancakes

Saturday, April 3, 2010

The Ugliest Cheesecake Ever


Wrinkles give these cheesecakes personality


For the longest time I have avoided making cheesecake. Don't get me wrong, I love it. So much. That's why I didn't wanna mess it up. That and the fact that an 8 oz block of cream cheese costs well over PhP 100 (that's just a local brand, not even Philadelphia!). So the thought of fudging it up and wasting money at the same time was enough to make me step away from all the delicious cheesecake recipes online.

Recently, I stumbled upon a recipe that really tempted me. It didn't have a lot of ingredients and instead of using a springform pan (which I've never seen in real life) made use of a muffin pan. I figured making cheesecake muffins would be a far lesser task. The recipe was a success. I made it a few more times, dressing it up with strawberries and whipped cream, eating it plain. It was just that good.


This is NOT low carb

When I decided to go low carb, I looked at that recipe and just by simply removing the crust turned it into something I could enjoy - albeit in small portions - and still stay on plan. Even better news is it's allowed on Induction! Magic words, right?

Now you can definitely make this prettier but unless you want other people to steal it, DON'T. Who cares about those wrinkles anyway? Or the fact that sometimes the middle part sinks? It might not be pretty but damnit it's good! AND LEGAL! Again, the magic word!

The Ugliest Cheesecake Ever
*Adapted from various cheesecake recipes and inspired by Chocolate Kiss' Sour Cream Cheesecake
serves 12

Ingredients

16 oz cream cheese
1 C Splenda (NOT sugar blend but granular)
2 t vanilla
4 T lemon juice
3 T sour cream
2 eggs


Forgot to take a pic with the cream cheese. Sorry!


1. Preheat oven at 325. Prepare 12 cup muffin pan.

2. With a mixer, beat the cream cheese until there are no more lumps. Slowly add the Splenda, incorporating both ingredients well.


Beat the cr*p out of that cheese!

3. Add vanilla, lemon juice and sour cream. Blend but make sure not to over mix.

4. Add eggs one at a time, gently mixing after each one.

5. Divide the batter evenly between the 12 muffin cups. I used an ice cream scooper to divide them equally.


Invest on an icecream scooper. It's convenient and not that messy to use.


6. Bake at 325 for 12 to 15 minutes depending on your oven. Check at 12 minutes and the tops should be set but not hard. I actually like to underbake this because the center has that ooey gooey cream cheesy filling that I love.

7. Let cool for at least 30 minutes. Put in the fridge for at least 2 hours. This is best eaten cold.

Carb count 3.7 per serving

Notes
If you want to make prettier cheesecakes, check this out.
If you're past Induction (woohoo!) you may add fresh strawberries on top or even do a nut crust.